Learning video editing can be overwhelming at first. There is a lot to wrap your mind around. Since this is an ultimate guide about how to edit videos, it may take a few minutes to read. For users who wants to edit a video fast and fun, try the Filmora editor. From the video above, you can see Filmora is suitable for creating videos for almost all scenarios. Even you shoot a video by entry-level camera, you can still import it to Filmora. Keep reading as we will show you more details about how to edit videos step by step, especially in Filmora. Approaching the post-production process requires you to be prepared and to know exactly what you want to do, with the footage you've captured.
Choosing the right setup and preparing your project
Sometimes the camera or a computer, if you were capturing a screencast, can influence your choice of the video editing software, because if the footage you are editing is in the format your video editor won't recognize, you'll have to find another software.
Desktop configurations for PC computers have gotten more powerful over the years, but Mac computers are still a much better option for video editing because the Mac OS is optimized to enhance the performance of the computer's hardware components. However, these differences matter only to professional video editors who work on demanding projects. Inexperienced video editors can use PC and Mac computers, equally effectively to edit their videos.
The video rendering process is one of the most demanding tasks on any computer, which can last for hours. A powerful CPU can shorten the video rendering time, and enable your video editing software to run faster. Intel's processors from the i5 and i7 series are widely accepted as the best CPUs for video editing, since they make adding transitions to videos, applying filters and effects or video rendering much smoother.
Most video editing software products don't require more than 4 or 8GB of RAM memory to run properly. However, working with large video files can slow down your computer considerably and even make it crash at the decisive moment, so in order to avoid losing hours of work you should get as much RAM memory as you can possibly get.
Sometimes a single video file can have more than a couple of gigabytes and the videos you export from the video editing software require a proper storage space. Most experienced video editors use an external hard drive that has several terabytes of storage space for their video editing projects.
At first, you won't be able to notice how important the graphics card is for the video editing process, because you won't be performing the graphically demanding video editing tasks. Even if you don't have any intention of creating 3D or special effects, you have to pay attention that the computer you're working on has a graphics card capable of high-end performances.
Being able to see the video files on a large screen can help you spot even the tiniest mistakes. Professional video editors frequently use two monitors when they are working on a project, but people who are just learning the ropes of the trade need just one high definition display. Focusing on 4K video editing? Performing the basic video editing actions such as trimming or cutting videos, adding music or applying transitions between the shots doesn't require you to have a computer that has high-end components.
Filmora: features, licensing, and why it suits beginners
Wondershare Filmora is a video editing software designed for cross-platform use. It is a versatile and user-friendly option that caters to both beginners and experienced editors. Filmora is ideal for beginners because it’s a user-friendly, drag-and-drop software. The clean interface and prominent source-switching buttons make it more digestible, while the range of templates, presets, and features - which we’ll cover in a few minutes - make it ideal for those finding their feet. That doesn’t mean Filmora is exclusively for amateurs, though. The software is bursting at the seams with advanced features, whether they be AI editing tools, audio visualizers, color matching, or something else entirely.
Filmora has a vast media library and supports all the essential video formats. It is extremely easy to use and budget-friendly. The basic video editing techniques are the same in all video editing suites. In this guide, we are going to show you how to edit videos in Filmora, but you can apply the skills you will learn here in other video editing programs.
Filmora offers a variety of features and tools to help you create engaging videos. To start editing, you’ll need to import your media files into Filmora. Organizing your media files can save you time and make the editing process smoother.
Filmora’s mobile app is best for beginners who want to create scroll-stopping content anytime. Trim clips, add trendy effects, and layer in music without a laptop. Open Filmora Mobile and tap the + icon or New Project. Select the photos and videos you want to edit and click Import. Trim: Select the video track in the timeline. Drag the clip’s edges to adjust the length, or place the playhead where you want to trim. Animations: Select the video track, then tap Animation on the bottom menu. Tap Audio, then select Music or Sound FX. Once you’re happy with your edits, tap Export and choose the best resolution for your video.
Filmora allows you to perform all basic video editing actions effortlessly, while also offering advanced video editing features such Chroma Key Effect, image stabilization or Time-lapse. Additionally, Filmora has a vast media library and supports all the essential video formats. It is also extremely easy to use and budget- friendly. You never know what you are going to need in the video editing room, which is the reason why you have to be well prepared for all the challenges you will have to face during the video editing process.
Editing workflow in Filmora: step by step
- Double-click on Filmora's desktop icon, whenever you are ready to start working on a new video. The software's welcome screen will appear on the screen asking you to create a new project or open project.
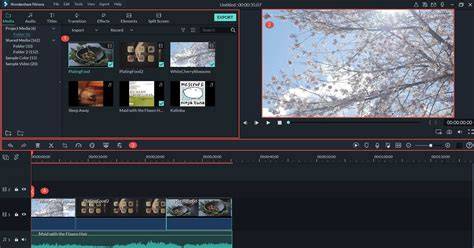
- Click New Project in the software's welcome screen, and wait for the editor to load. Head over to the File menu and click on the Project Settings option, and select the aspect ratio the final cut your video will have. You will be able to choose between several different options, including the standard 16:9 or 4:3 aspect ratios, but also less common 9:16 aspect ratio for vertically oriented videos as well as the 1:1 aspect ratio for square-shaped videos. In the upper left corner of the video editor you'll be able to see the Import button, click on it and select the Import Media Files option and then navigate to the location on your hard drive where the footage you want to edit is stored.
- The files you import into the editor will be stored in Filmora's Media tab, below the Import button. Working with a lot of different files in a single project is much harder if you have to look for the video clips you want to add to the timeline. Click on Add a New Folder icon, located at the bottom of the My Project tab in the upper right corner of the editor's screen, to create and name a new folder.
- Raw footage often contains mistakes or parts that simply don't belong in your video, so if you would like to cut or trim your videos, simply drag them from the Media tab, and drop them on the timeline. Press Play or hit the Spacebar to start previewing the video clips you've added to the timeline or use the playhead to jump to a certain point in the video. Filmora enables you to trim your videos by simply dragging the end of a video clip left or right.
- Click on the Text /Credit icon if you want to add opening titles, end credits or subtitles to a video. The software offers a lot of different text templates you can use for a wide range of purposes. Drag and drop the template you selected to the desired location on the timeline, and proceed to insert the appropriate text in the software's preview window. The Transitions icon, that grants you access to hundreds of options is located next to the Text/Credit icon in the editor's toolbar.
- The Effects icon offers over several hundred filters and overlays effects you can use in your projects, in order to make the colors in the video look more vivid. Click on the icon and select the filter you'd like to use, and then drag and drop it wherever you want on the timeline. Besides filters, Wondershare Filmora also offers advanced color correction tools, which allow you to fine-tune the color values in your videos. The Advanced Color Tuning option enables you to use color correction presets or 3D LUTs to add more vibrancy to the colors in your videos.
- When you are absolutely sure that there is nothing more you'd like to add or remove from your project, you should click on the Export button. When you're done editing, click the Export button. You can optimize the video for smartphones, iPads, or gaming consoles. Filmora users who don't want to save a video file to their hard drives can export their videos to Vimeo or YouTube. This method of exporting videos allows you to save time on waiting to upload the video online since the rendering and uploading processes happen simultaneously.
Advanced features and occasional tips
Filmora’s editing suite bundles a smorgasbord of tools together. If you've filmed content with a green screen and would like to chroma-key a background onto your footage, Filmora’s got the goods. In a similar breath, you can use Filmora’s Smart Cutout tool to remove a background and create a ‘cutout’ effect. Transitions
There’s no time to look for music and videos from third-party sites. Last but not the least, if you’re buying a video editor, you should check the customer support reviews before going ahead.
One thing you do need, though, is great music. Our catalog is high-quality, affordable, and safe. An Epidemic Sound subscription goes beyond royalty-free music, removing the headache of licensing and freeing you up to do what you do best. You can enjoy the safety of our license hand-in-hand with our massive catalog of 50,000 tracks, covering just about every genre you can think of. It’s better than royalty-free. It’s worry-free.
Exporting, formats, and common questions
The software allows you to perform all basic video editing actions, effortlessly, while it also offers advanced video editing features. The basic questions often asked include how to remove watermark from Filmora, whether Filmora has a watermark, and how to remove the Filmora logo. To remove the watermark, you can either purchase a license or use a free method. Changing the frame rate can make your video look smoother. In the project settings window, find the Frame Rate option. In the export settings, find the Resolution dropdown menu. A split screen allows you to show multiple videos at once. 8D audio can make your music feel like it’s moving around you. Removing noise can make your video sound clearer. Speeding up a video can make it more dynamic. Converting your Filmora project to MP4 online is easy. Click Convert and wait for the process to finish. Saving your video in Filmora is straightforward.
Filmora is a versatile and user-friendly video editing software that caters to both beginners and experienced editors. By understanding its interface, mastering its features, and utilizing the tips provided, you can create impressive videos with ease. Wondershare Filmora 12 Tutorial for beginners! Learn how to use the new Filmora Video Editor and start editing in this awesome video editing software like a PRO. Video: Wondershare Filmora 12 - Complete Filmora Video Editor Tutorial!
Open Filmora 12 and set up the aspect ratio (e.g. Mastering Wondershare Filmora 12 equips you with the tools to create stunning videos with ease. If you want to learn how to edit videos faster and more efficiently in any video editor, check out our free PDF guide The Primal Video Method. Join 120,000+ creators Get the latest video tech tips, tool reviews, and AI workflows delivered to your inbox. No spam. Search Primal Video guides Member masterclass Masterclass details What you will work through Get the full August 17 issue See the latest Video Tech, Tools & AI we're geeking out on. We'll send you the latest Insider newsletter, including the Biggest Step Forward In AI Editing. You'll also receive future Insider issues, usually every second week. No spam. Unsubscribe anytime.
Note: The text above is reorganized and condensed for clarity in this guide.