In Photoshop Elements, you may have an occasional need to add text to an image: a caption, a headline, or maybe even a short paragraph. Point: Use this mode if you want to enter only a few words or so. To create point type, select the Type tool, click in your image, and, well, type. The text appears while you type and continues to grow. Remember that point type never wraps around to a new line.
Paragraph: Use this mode to enter longer chunks (or constrained blocks) of text on an image. To create paragraph type, click and drag your type tool to create a text bounding box, and then type. All the text is entered in this resizable bounding box. The majority of your type entry will most likely be in point type mode. Your cursor is called an I-beam. When you click, you make an insertion point. You can also commit the type by pressing Enter on the numeric keypad or by clicking any other tool on the Tools panel. A new type layer with your text is created. If you have larger chunks of text, it’s usually more practical to enter the text as paragraph type. Entering paragraph type is similar to entering text in a word-processing or page-layout program, except that text is contained inside a bounding box. Drag to create a bounding box close to your desired size. Hold down the Alt (Option on the Mac) key and click the image. The Paragraph Text Size dialog box appears. Enter the exact dimensions of your desired bounding box. Each line wraps around to fit inside the bounding box. If you type more text than can squeeze into the text box, an overflow icon appears.
About This Article: This article covers practical techniques for adding text in Photoshop Elements and Photoshop, including point and paragraph type, bounding boxes, and common shortcuts to manage text layers and transformations.
First, create a new text layer by selecting the Type Tool, then click inside your document to begin typing. You can resize and reposition text using Free Transform. Press Ctrl+T (Win) / Command+T (Mac) to bring up the Free Transform box and handles around your text, then drag to resize. Hold Shift to preserve proportions, or Alt/Option to resize from the center. To see your text well, place the text layer above the image or use a clipping mask design to fuse text with image content.
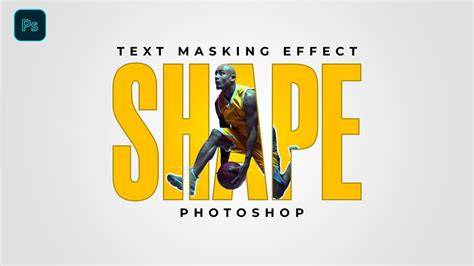
To place an image inside text, use a clipping mask: move the text layer above the image layer within your layers, then clip the image to the text so the photo shows through the letters. You can add a drop shadow through the Layer Style dialog box to improve legibility and depth. The Drop Shadow option is among the effects you can apply to the text. Bevel & Emboss, Overlays, and other Blending Options offer additional ways to customize typography for a professional look.
Additionally, you can work with different text tools and settings. Horizontal Type Tool is the most common, while Horizontal Type Mask Tool can create a mask for more complex effects. The Character and Paragraph menus provide complete control over typography, including kerning, leading, and alignment. If you don't see a particular option, try selecting Layer Style first, then Blending Options to access a broader set of effects.
To add new fonts, find and install fonts online, then drag them into Photoshop to load. In the workflow, you can create text on a blank layer, fill areas with color, and then apply image clipping to craft visually striking results. When text editing is needed on an image, you can quickly switch tools or press Enter on the keypad to commit edits, or press Ctrl/Command + Enter to preview final placement. If the text tool misbehaves, create a new layer and retry.
In practice, the majority of text work is done with paragraph type for longer blocks and point type for short captions. You’ll find the text settings menu at the top of the screen, where you can adjust font, size, color, and alignment. After typing, you can further refine by re-entering Free Transform or reapplying a clipping mask for image-to-text effects. The goal is to balance readability with visual impact, using contrast, shadows, and subtle effects to integrate text into the image.
JPEG image files are a simple and easy way to share your text-overlaid creations online. To make changes like adding text to a JPEG, you need a photo editor like Photoshop. Just open your image in Photoshop, add text, and save your new JPEG under a new file name. There are virtually endless ways to achieve intriguing, engaging, and stylish work by adding text to photos in Photoshop.
- Choose the Type Tool and click to start typing.
- Use the Paragraph Tool to create bounded text areas for longer passages.
- Resize and reposition text with Free Transform.
- Use clipping masks to integrate image content with text.
- Apply Layer Styles for shadows, outlines, or glow.
Images and videos can be added to enhance the article itself when appropriate. For instance, a diagram showing point type vs. paragraph type may help readers visually compare modes, and a short tutorial video could illustrate the clipping mask technique in action.
CLIPPING MASK-for Pushing Image into Text
Tips: If you’re working with text that needs to appear over a complex background, try using a solid color behind the text, or apply a subtle drop shadow or stroke to improve legibility. Keyboard shortcuts help speed up the workflow, and switching between Type Tool settings allows for precise control over typography. The Paragraph and Character panels are your go-to resources for fine-tuning spacing and alignment, while Blending Options unlocks a range of finishing effects.
Sample workflow recap: start with Type Tool, create point or paragraph text, adjust font and size, move or transform, optionally clip an image to the text, add effects like drop shadows, then finalize with a clean save. With practice, you can place text in circles, rectangles, or custom shapes to create dynamic compositions that captivate viewers.