OverviewThere seems to be exactly three ways to do anything in Adobe Illustrator, and clipping masks are no exception.
1. Clipping Masks
Let's start out with the simplest way to mask objects and photos - the beloved Clipping Mask. A clipping mask is a shape that only reveals artwork within its boundaries. Think of it like looking through a window; there's lots to see outside, but you can only see what's revealed through the window.
Group the artwork you want to be clipped by selecting all its pieces and pressing Ctrl+G or ⌘+G. For our example we'll use the stone head of Zardoz; I've selected all the different pieces of the mighty stone head and grouped them together. Trying to clip multiple ungrouped objects will sometimes result in only one object getting clipped. Pre-CC Illustrator was nasty about this, so old habits are still fine.
The Illustrator Appearance panel is very powerful. Place the shape you wish to use as a clipping mask on top of your grouped art. Make it a wild color so it's completely obvious this is a mask. I find this helpful because un-styled paths are easily lost or forgotten, especially when working with complex designs. Let's mask the eyes of Zardoz with a simple rectangle.
Select both the art and the intended clipping mask. The often misunderstood Pathfinder tool. Feeling lucky?
2. Compound Clipping Masks
A compound clipping mask simply means the mask is comprised of many different shapes. Instead of a simple rectangle like the first example, we'll use a more complex shape, such as the Zardoz logotype.
Just like before, group your artwork to be clipped (Ctrl+G or ⌘+G). We'll be masking this background landscape scene into a logotype. Compound paths behave like a single object. A compound path is similar to a group, where many objects or shapes behave as one. The difference between this and a group, is that a group is a container full of objects, whereas a compound path is a single object made of many shapes - these shapes will all behave as one, and will all share the same attributes such as strokes, fills, etc. Ponder that for a moment.
Select both the art and the compound clipping mask.
3. Transparency Shape Masks
Up until now, a clipping mask would only let you hide and reveal artwork - the artwork is either visible or it isn't. A transparency shape mask is a mask with varying levels of transparency and lets you use gradients and patterns to mask artwork in exciting ways. We'll use part of the Zardoz logotype and make something new.
Once again, group your artwork to be clipped (Ctrl+G or ⌘+G). Select the grouped art and make a copy of it (Ctrl+C or ⌘+C). You'll want the copy for the next step. Click the Make Mask button; this will completely hide your artwork for now. By default everything is masked and hidden. Remember the rhyme: black conceals, white reveals - like the black mask of a bank robber; you can't see their face - just like how you can't see your artwork. Select the black Opacity Mask in the transparency panel. This will put you into mask editing mode. Anything placed in the transparency mask will only be used to mask artwork. Go ahead and paste the copy of the logo from earlier in front (Ctrl+F or ⌘+F) and make it white. Let's start adding black and white gradient boxes inside the opacity mask. Try to stick with black and white only (black will fully conceal, white will fully reveal) - colors and anything in between will only partially mask.
4. Transparency Layer Masks
A transparency layer mask is basically a single large image that acts as the transparency mask. The light and dark values in the layer (or imported photo, texture, whatever) determine the amount of masking applied to your art. For this example let's go back to the mighty stone head of Zardoz and apply a layer mask. Group your artwork to be clipped as before (Ctrl+G or ⌘+G) and import a photo or texture into your Illustrator document. Open the Transparency panel and click Make Mask. Experiment with the Clip and Invert Mask options to see the different mask behaviors. By default, the white areas will reveal and the black areas will conceal. You can select the Opacity Mask in the transparency panel to further refine the mask placement, scale it up or down, and add more masking elements.
Wrapping Up
Now that you know there's more to masking in Illustrator than Clipping Mask > Make, go forth and use these new mask powers to hide parts of your design that you don't want anyone to see. Please note that you can also create masks in SVGator, so there's no need to use a third-party editor tool. To learn how to create one, watch the following SVG Masks Tutorial. If you would rather create the mask in Illustrator, please follow the steps below.
The object you want to use as a mask must be placed in front of the other element. In this case, we will use the blue circle to mask the orange star. Select both objects, right click, and choose “Make Clipping Mask”.Make sure you rename the <Clip Group> from the Layers panel with something similar as in the image below. Untitled groups and layers will not be exported.To export, go to File, Export, Export as…Choose SVG format and select the destination folderSet the export options from the SVG Options panel like in the image below and click OK.Import the SVG file into SVGator.
Please note that there's a browser compatibility error with Safari. In case you are running SVGator in Safari, the clipping mask will not be visible after the import. You can read more about this here.
More articles:Creating Masks in Gravit Designer | SVGator Help
The object you want to use as a mask must be in front of the other element. Select both objects, right-click, then choose “Mask with Shape”:SVGatorCreating Masks in Affinity Designer | SVGator HelpThe object you want to use as a mask must be in front of the other element. In The Layers panel, right-click and choose “Mask to Below”.SVGator
Still got questions? Layer masks control the visibility of layers without editing the layer itself. Layer mask controls the visibility of layers to which it is applied. Create the object you want to use as the mask. For example, in the image below, the first layer, a cutout portrait of a woman, is used as a clipping mask and the colourful texture layer is the upper layer. You can swipe between the layer and the layer mask to see how your mask edits are impacting the layer. If you want to switch from the layer mask to the layer, swipe right on the layer mask thumbnail. This makes the layer, rather than the layer mask, active so you can edit your drawing. By default, a layer and its mask are linked. If you have a question to ask or an idea to share, we would love to hear from you. Masking in Illustrator is a handy skill for anyone in design. However, even though it is not difficult to master, many beginners have difficulty. In this tutorial, I'll detail how to create a clipping mask in Illustrator, what it's for, and how to use it to make perfect pics.
Don’t feel like reading the whole breakdown? Always keep the masking shape on top of the objects you want to clip. What is a clipping mask, and why it's used for? From the name of this tool (derived from clipper), it is clear that its purpose is to cut off objects. That is, this mask is a kind of window that makes it possible for us to see objects inside the clipping path. You can prepare two or more objects on the artboard, but only those inside the clipping mask boundary will be visible in the final image. Do not confuse it with a layer one. We use both tools to mask something on the artboard, but they work differently. The main dissimilarity between them is that the second tool uses one layer to hide things. The first tool uses several layers called the clipping mask's group. In this case, the mask is placed at the top of the objects, and all the layers below are clipped to its shape.
How do PRO designers use clipping masks? The guys at Adobe originally conceived it as a tool to put a pattern inside any shape. For example, you can draw a pinstriped tie using the shape of the tie as a mask. You can also make the text on your illustration stand out by adding a colorful pattern to it. This is what a tool does at a basic level. In addition, there are a couple of cool ideas to make designing more eye-catching.
Create unique posters and covers for magazines/books/music albums, etc. The Illustrator's clipping mask tool is constantly used when creating images for printing. Take your collages to the next level by creating extraordinary transitions from one image to another. For example, you can create the effect of a torn poster showing another picture underneath. Play with surrealism and illusions if you are a photographer. Even the most ordinary portrait can be turned into a work worthy of a Salvador Dali brush if you know how to clip in AI. Create social media ad creatives that surprise your customers and attract hundreds of new followers to your profile. By creatively applying a clipping mask, you can come up with a brand identity that will make it recognizable in all countries of the world.
How to make a clipping mask in Illustrator?
First of all, let’s figure out how to create a clipping mask in Adobe Illustrator. There are several ways:
- Drop Down Menu: Navigate to Object > Clipping Mask > Make. This menu option is straightforward and guides you through the steps.
- Shortcut Key: Press Command + 7 on a Mac or Ctrl + 7 on Windows to quickly create a clipping mask using the keyboard.
- Layer Panel: Look for the 'Make/Release Clipping Mask' icon at the bottom of the Layers panel. Clicking this icon toggles the clipping mask on or off for selected objects.
- Right-Click Method: First, select all the objects you want to include in the clipping mask by clicking and dragging over them or holding Shift and clicking each object. Then, right-click and select 'Make Clipping Mask' from the contextual menu.
A clipping mask can only be a vector object. But inside, you can place both another vector object and a raster one or even a group of different things. Let's create a shape in Illustrator to practice. Let it be an ellipse (hotkey L):
Now we need to prepare the contents. I chose a random bitmap on my PC and also created a vector flare, also random: Tip: You can add a bitmap in any way. I click and drag it to the artboard from explorer.
The first and most important rule: the Adobe Illustrator clipping mask must be placed on top of the objects that you will place inside! So I go to the layers panel and drag the ellipse up (since I created it in the first place, I had it on the bottom). I also removed the fill for clarity and placed my photo and flare below the figure:
Now we are going to clip. Select all the objects, right-click on them and choose “Make Clipping Mask” or press Ctrl+7. Please note that you can't see the outline now. The same thing would have happened to the fill if I hadn't removed it earlier. That is, a clipping mask is an object without an outline and a filling. To create outlines, first press Ctrl+Z to deselect. We need to copy our ellipse to the clipboard, so select the desired shape and press Ctrl+C. Now select all the objects again and create a clipping mask as you did before. To place the copied ellipse with the clipping path exactly on top of the mask, press Ctrl+Shift+V. Here is your result:
Well, friends, now you know how to mask in Illustrator, but what if you already created a clipping mask and later wanted to edit the object inside? To do so double left-click on any object (all of them are highlighted when you hover over them.) You can drag and recolor objects, change their size and angle, and do everything you normally do when working in Illustrator. When you're happy with the result, just double-left-click on an empty space to finish editing.
I also want to draw your attention to the fact that it is not in vain that Illustrator initially provides for the use of a clipping tool without an outline and a fill. This will allow you to create unusual shapes and line breaks that will look great in your design. For example, I created two shapes: a star and a circle. By placing the circle on top of the star, I can apply a clipping mask to create some fancy lines: This is the simplest example, but it perfectly shows how you can create unusual art with clipping masks in Illustrator if you have a cool idea. So get creative! Now, that you know all secrets, I hope, you'll impress with your work!
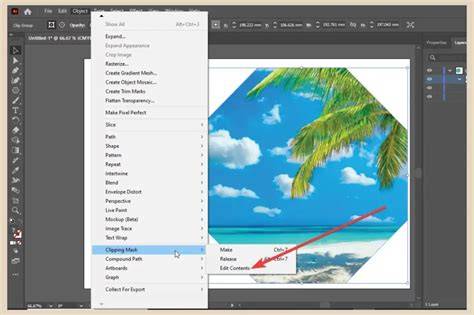
How to do Clipping Mask in Illustrator - 2 MINUTE Tutorial
Get some extras: masking in Luminar Neo. This is something really special that I also want to share with you. Luminar Neo allows you to mask your photos to make them look their best! You can also touch up the masked area with a brush to achieve an impressive result. The program has the following types of masks: Brush mask, Linear Gradient Mask, Radial Gradient Mask, Mask AI. The first is a perfect tool for meticulous editing. With careful strokes, you can fully control any changes in the masked area. Gradient masks allow you to create smooth transitions and work with elliptical areas and objects. Mask AI is the coolest feature of Luminar Neo when it comes to photo masking.
ConclusionI have heard from beginners more than once that masks and layers are the most incomprehensible and complex functions in any graphic or photo editor. However, in fact, these functions are easier to understand than it seems at first glance. You see this with Illustrator masking, so why should it be harder in other cases? Do not be afraid to explore the possibilities of your programs, as this will certainly affect the quality of your work. Once you get the hang of the clipping mask in Illustrator, I'm sure you'll feel it for yourself!
That's all for now. See you (write you) in future articles. Good luck!
tags: #layer #mask #illustrator