Speech bubbles are useful for conveying ideas in design and are used frequently in web, graphic and logo design and also as icons. Photoshop CC comes with a set of speech bubble shapes just waiting for you to use them, but they are hidden away a little bit. Photoshop comes with five basic shape tools - the Rectangle Tool, the Rounded Rectangle Tool, the Ellipse Tool, the Polygon Tool, and the Line Tool. Photoshop also comes has the Custom Shape Tool which allows us to create more interesting and complex shapes such as snowflakes, pawprints, light bulbs and … speech bubbles. The really great thing about all of these tools is that they are Vector drawing tools. That means we can make the shapes bigger and smaller without any loss of quality.
In this guide, you’ll learn how to create and modify vector speech bubbles, and you’ll discover how to load additional shapes and customize their appearance. I’ve added a special cheatsheet to this post - a three page PDF which includes a Custom Shape Quickstart and a visual guide to all of Photoshop’s Custom Shapes.
Getting started with the shape tools
1. Click and hold on the Rectangle on the toolbar and you’ll see the full set of vector drawing tools appear. 2. On the Options bar at the top of the screen, make sure the first drop down option is set to Shape. This ensures that you are creating vector shapes which will either be filled with the colour and/or stroke colour you choose. Next, select a Fill colour. In this example, I’m using red. Leave the Stroke colour as empty and ignore the rest of the options except the actual Shape option. 3. Drag out the shape in your image window. When you’ve dragged the speech bubble to the size you want, release the mouse. Ok, now you have a lovely speech bubble, but let’s say red is not your colour.
To change colour, double-click on the thumbnail (highlighted in green below) on the new Shape layer that you’ve just created. Simply choose whichever colour you like best by picking a base colour in the tall colour slider strip, and then click in the main colour field to choose how light or dark that colour will be. You’ll notice that the nice thing about shape layers is, when you double-click on their thumbnail to change colour, you can try out lots of colours before clicking OK as the changes will happen as you move around the colour picker.
Alternatives for changing colour include selecting the speech bubble, then on the Options bar click on the Fill colour. You can choose No Color, a solid color, a gradient or a pattern. By default, the solid color is selected and when you choose one of the swatches below, it will instantly change to that colour.
Adjusting stroke and exploring more shapes
With the Custom Shape Tool selected as before, go to the Options bar. Change the width of the stroke by clicking on the drop-down menu and dragging the slider to the right to increase the thickness and to the left to decrease the thickness. You also have a choice of solid, dash or dotted lines on your stroke. Now you know how to create and modify a vector speech bubble, you might be wondering if that is the only speech bubble shape available in Photoshop? Well no, there are actually quite a few more hidden away for us to play with.
1. With the Custom Shape Tool selected, in the Options bar at the top of the Photoshop screen, click on the Shape drop down. 2. A dialog box will open asking if you want to Replace or Append the current set of Shapes. 3. 4. Click on the bubble you want to draw and then click and drag out the shape on the image window. I hope you’ve found this useful.
There are several steps to expanding your library of shapes: load Legacy Shapes if needed, then create the speech bubble path, and finally edit its appearance and text. The process is designed to be flexible so you can mix and match fills, strokes, and layer styles to achieve your desired look.
Working with a library of speech bubbles
Here is a library of speech bubbles and tails for use with the custom shapes tool in Photoshop. It’s easier to work with when the bubbles and tails are separate, then they can be positioned and sized separately. You can download the Custom Shape library here. Once downloaded, copy it into the ‘Adobe Photoshop > Presets > Custom Brushes’ folder. When you open Photoshop and switch to the Custom shape tool, you can have all these shapes set up as a custom shapes library in Photoshop.
Next, continue with the workflow: define the custom shape, then Layer Style settings such as Stroke and Color Overlay, and finally, text placement. The steps are designed to be followed in sequence, but you can adapt them to your own project needs.
Practical workflow: from path to finished speech bubble with text
- Select the Custom Shape Tool (U) and Path from the Options bar. Choose a speech bubble shape from the Shapes panel or Shape dropdown.
- Click and drag to create the speech bubble path on the canvas.
- Create a new layer named Fill, fill the path with the foreground color, and then create an Outline layer to stroke the path with a brush. Adjust brush size as needed.
- Apply layer styles to the Fill and Outline layers, such as Color Overlay, Stroke, and Drop Shadow to unify the look.
- On a new Horizontal Type Tool layer, add your text and adjust typography as needed. Use Free Transform to resize the text and position it within the bubble.
Our current design example shows how the fill, stroke, and text can be combined for a bold comic-style result. You can also add additional layer styles to the text to enhance the design further, such as a Color Overlay, Stroke, and Drop Shadow, or follow other tutorials like creating 3D comic text for similar effects.
Loading and using legacy shapes
Step 1 - Load Legacy Shapes if Needed: Open the Shapes panel (Window > Shapes), click the menu button at the top right of the panel, and select Legacy Shapes and More. The Legacy Shapes and More folder will be added to the end of the list in the Shapes panel. Step 2 - Create Speech Bubble Path: Select the Custom Shape Tool (U) from the left toolbar, and choose Path from the dropdown in the Options bar at the top. Then select a speech bubble shape in the Options bar or the Shapes panel (Window > Shapes). Note: the speech bubble shapes are located by going to Legacy Shapes and More > All Legacy Default Shapes > Talk Bubbles. Step 3 - Edit Speech Bubble Appearance: Add a Fill to the Speech Bubble Path, then Stroke Path for an Outline, and apply Layer Styles to modify color and effects. Step 4 - Add Text: Use the Horizontal Type Tool to insert text and adjust its position and size with Free Transform. You can also apply layer styles to the text for enhanced appearance.
Knowing how to create speech bubbles in Photoshop can be very useful as they can be used for all sorts of designs. Maybe you need a speech bubble for a comic book or manga, a pop art poster, or just for a sticker design. Whether you’re aiming for a bold meme, a clean icon, or an illustrative element, these techniques help you craft expressive dialogue or thought bubbles with professional polish.
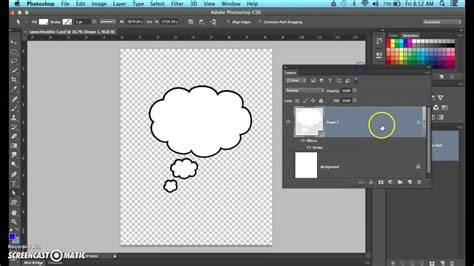
Photoshop CC - Recover Legacy Shapes - Find & Add Legacy Shapes to Photoshop CC
In comic books, the speech bubble is most often oval, but it can also be rectangular or have a more unusual shape. Speech bubbles contain the texts spoken by comic book characters or their thoughts. This set includes 18 free vector custom shapes of speech balloons. They are perfect for making memes, comic strips, presentations, educational materials, and any project that needs dialogue or thought bubble elements.
What’s Included: Frequently asked questions, licensing terms, and file formats. The download is a ZIP archive containing .CSH files. Unzip it first, then use the files inside. To use it in Photoshop, download the .CSH file and double-click it, or open Window → Shapes and choose Import Shapes from the panel menu.
Knowing how to load, edit the appearance, and add text to speech bubble shapes that come with Photoshop is a practical skill for designers at all levels. We’ve shown loading legacy shapes, creating paths, filling and stroking, applying layer styles, and adding text with appropriate typography for a cohesive final result.