Lens flare is a creative effect that can illuminate your photos with a unique starburst or soft bokeh look. Starbursts, halos, and more can add a dramatic touch to photos, whether you’re shooting into the sun or using artificial lights in the studio. You can even create a lens flare from scratch in Adobe Photoshop. Lens flare can happen when a bright light source hits your camera’s lens.
This light can show up in the form of circles, rings, starbursts, or an allover haze in your photo. Lens flare can add a warm softness to backlit portraits, define landscape shots, and help you naturally achieve a cinematic or sun-drenched look. Lens flare often appears in photographs as circles or rings that emanate from the light source. These visible spots, or artifacts, are called ghosting. In some cases, a haze of light covers the entire scene, which can result in washed-out, low contrast photos. This allover haze is called veiling, and it occurs when the light source is out of the frame and to the side of your lens, but the rays still hit the lens’s front element. Veiling can be used intentionally to create a soft, warm mood for your photo.
A starburst effect happens when you shoot with a smaller aperture, such as f/11 or f/16. Aperture is the adjustable lens opening that controls the amount of light allowed into the camera. Used in cinematography, anamorphic lenses capture a wider field of view without distortion. This is made possible, in part, by their square shape and horizontal lens elements. This shape is also what produces the distinct horizontal flares these lenses are known for. Director J. J. Abrams is well documented for his use of anamorphic lens flares.
To get lens flare, shoot directly into the sun or another light source. The best approach is to try a lot of different angles, so that even if some are blown out, you can see what works and what doesn’t work, as advised by experienced photographers. It may take some trial and error, since how your flare shows up depends on a number of factors. Different equipment produces different results when it comes to lens flare. Most modern lenses come with an antireflective coating designed to avoid glare. Because of this, you may find more success capturing lens flare when you use an older lens. UV filters, polarizers, or neutral density filters can also reduce the amount of flare you pick up. Zoom lenses produce more sun flare effects, as the increased number of lens elements amplifies the number of internal reflections within the camera, which cause lens flare.
Aperture has a huge effect on the outcome of your flare. At wider apertures, the sun appears larger and more diffused, and the flares are softer shapes. If you choose to shoot wide open, watch for the narrow depth of field and make sure your subject is in focus. At sunrise and sunset, known to photographers as the golden hour, the sun is lower in the sky. During these times it’s easier to capture the sun in frame, and thus create a lens flare effect. Plus, the light is softer and naturally more diffused. In the studio it’s easier to create the lens flare you want because you have more control over the light and its intensity, color, and height.
To capture lens flare in outdoors shoots, you run the risk of capturing a washed-out, backlit, or silhouetted photo. Create a new layer. Go to Filter › Render › Lens flare. When it comes to lens flare, aperture is the star of the show. How wide or narrow you set your aperture has the most impact on how your final shot turns out. This means you have to balance the other components of your exposure triangle - shutter speed and ISO - to make sure you properly expose your photo.
If you find yourself in the middle of a portrait session, it can feel like you don’t have time to dial in your settings. But photographers encourage taking time to experiment and to overcome the impulse to rush. While lens flare looks great in some photos, it can be unflattering in others. In cases where the light is too intense, you can try to diffuse it. It’s all about controlling your light. Make sure your lens is clean. Whether you want to give your portraits a soft, dreamy look or bring a landscape photo to life with sun rays, experimentation is the key to capturing some flares of your own. Try new things and don’t be discouraged if you don’t get your desired effect immediately.
Practical steps to edit and enhance lens flare in post
Open your image in your preferred editor and duplicate the background layer to preserve the original.
Isolate flare artifacts using selection tools if you want to control their intensity or color independently.
Use a dedicated Lens Flare filter or recreate flare using light-painting brushes on a separate layer in Photoshop.
Adjust blending modes (Screen, Lighten, Overlay) to integrate the flare with the scene without overpowering it.
Fine-tune color temperature and saturation to match the overall mood, aiming for a natural or stylized look as desired.
Experiment with different layers and masks to ensure that the flare enhances rather than dominates the composition. If you want a soft, ethereal glow, diffuse the effect with a gentle Gaussian blur on a separate layer and blend softly into the scene. For a crisp starburst, emphasize high-contrast edges and maintain a sharp focal point on your subject where appropriate.
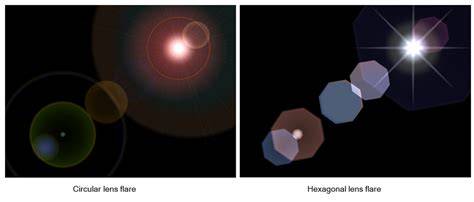
Table: Common lens flare characteristics and how to influence them
| Characteristic | How to influence |
|---|---|
| Ghosting | Use different angles and apertures; test older lenses or filters |
| Veiling glare | Keep light sources partially off-frame or use diffusion |
| Starburst | Shoot at small apertures (f/11-f/16) |
| Soft haze | Wider apertures for diffused light |
Better Lens Flares - 9 Tips for S_LensFlare [Boris FX]
In summary, lens flare can be a powerful storytelling device when used thoughtfully. It can add warmth, drama, and cinematic quality to both portraits and landscapes. With practice, you can predict how different variables-aperture, light position, lens coatings, and post-processing choices-combine to shape your final image. The key is to approach flare as a controllable element rather than a unavoidable nuisance, and to keep experimenting until you achieve your desired look.