Removing background colors in Photoshop is a fundamental skill for digital artists and photographers. We'll guide you through the process of removing background colors in Adobe Photoshop. Photoshop's powerful tools and features can be overwhelming at first. The Photoshop workspace is highly customizable. The toolbar on the left contains selection and editing tools. The menu bar at the top provides access to all Photoshop features. Layers are crucial for non-destructive editing. We always work with multiple layers to preserve original images. To open the Discover panel, click the search icon in the upper right corner of the Photoshop window. Type "remove background" in the search bar. The Properties panel often shows Quick Actions related to your current task. Quick Actions are part of Adobe's effort to simplify complex tasks in Photoshop.
Photoshop offers several powerful tools for selecting and isolating objects from backgrounds. The Magic Wand tool excels at selecting areas of similar color. To use the Magic Wand, we select it from the toolbar and adjust the Tolerance setting. For best results, we use the Magic Wand on images with simple, solid-color backgrounds. The Quick Selection tool is more advanced and ideal for detailed selections. To refine our selection, we can add to it by painting more areas or subtract by holding Alt (Option on Mac) while painting. This tool works well for images with complex backgrounds. The Object Selection tool uses AI to identify and select entire objects. This tool is excellent for quickly selecting well-defined objects. We can refine the selection using the Select and Mask workspace.
- Mastering advanced selection methods enhances precision when removing backgrounds in Photoshop. The Pen Tool offers unparalleled accuracy for creating selections around intricate shapes. We start by clicking to create anchor points along the edge of our subject. To complete the selection, we connect the last point to the first. Once our path is closed, we right-click and choose "Make Selection". For hair or fur, we can combine the Pen Tool with other techniques. Select and Mask is powerful for fine-tuning selections, especially for subjects with complex edges. Within this workspace, we use the Refine Edge Brush to paint along problematic areas like hair or fur. The Output settings allow us to choose how our refined selection is applied.
Layers are essential for removing backgrounds in Photoshop. To start working with layers, we need to open the Layers panel in Photoshop. The Background layer is typically locked by default. To create a new layer, we click the "Create a new layer" button at the bottom of the Layers panel. We can rearrange layers by dragging them up or down in the panel. To hide or show a layer, we click the eye icon next to it. Layer masks are powerful tools for removing backgrounds non-destructively. White areas on the mask reveal the layer's content, while black areas hide it. Gradients can be applied to layer masks for smooth transitions between visible and hidden areas. We can disable a layer mask by Shift-clicking its thumbnail.
Photoshop offers powerful tools for removing backgrounds efficiently. The Background Eraser Tool in Photoshop is excellent for removing backgrounds with precision. To use it effectively, we adjust the brush size to match the area we're working on. We set the Sampling options to control how the tool detects background colors. The Limits setting helps us define how the tool behaves. As we erase, we keep an eye on the preview in the Photoshop workspace. The Magic Eraser Tool offers a quick way to remove large areas of similar color. To use it, we simply click on the background area we want to remove. We can adjust the Tolerance setting to control how much variation in color the tool will select. The Contiguous option lets us choose whether to erase only adjacent areas or all similar colors in the image. For more complex backgrounds, we might need to click multiple times in different areas. We can adjust the edge refinement to smooth out any rough areas along the cutout. We can also use the Shift Edge slider to expand or contract the selection boundary. For precise adjustments, we can use the Refine Edge Brush tool. Then, we go to Select > Inverse in the top menu.
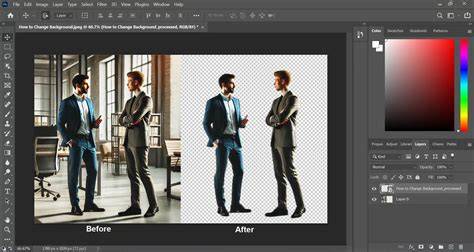
Removing backgrounds in Photoshop enhances images for various purposes. This allows us to place the person against any backdrop we choose. To achieve this, we typically start with the Quick Action tool for an initial background removal. For group portraits, we can remove individual backgrounds and composite the subjects onto a new scene. To start, we use the Magic Wand Tool to select and remove simple backgrounds. We ensure consistency across product lines by maintaining identical background colors or transparency. After removal, we often add subtle shadows to ground the product and create a sense of depth. Removing backgrounds in Photoshop involves several techniques and tools. Next, we use selection tools like the Quick Selection tool or Magic Wand to select the subject. Finally, we delete the background or add a layer mask to hide it.
To make a white background transparent, we first unlock the layer containing the image. We adjust the tolerance if needed to select all the white areas. After selecting the background, we create a layer mask to hide it instead of deleting it. After refining, we invert the selection to target the background. To use it, we open our image and click on the "Remove Background" option in the Quick Actions section. For specific color backgrounds, we often use the Color Range selection tool. Another technique is to use the Background Eraser tool. For green screen images, we can use the "Color Range" command and select the green color to create a mask. In this blog post, I want to share a quick tip for removing the background from your art in Photoshop.
There are many workflows depending on the image. The technique you choose can depend on background complexity and whether you need a precise cut or a quick result. If you’re interested in art licensing or selling your artwork online, turning your analog artwork into a digital file is a crucial skill to learn. For example, my leopard print design is now licensed on all kinds of products like phone cases, bedding, planners, and lunch bags. In the example of the phone case, I needed to remove the background from this design in order to fit the style of that product. Removing the background from your illustration gives you so much flexibility in the kinds of products that it can be used on. The paper background can also look a little dull when the artwork is turned into a digital file, so removing it allows you to replace the background with something more vibrant and fitting to the products that you plan to use the design on.
This will work best with a piece of artwork with one subject on a plain background. I’m going to use my signature art heart in my example. Here is an example of my art heart with a transparent background on a piece of wood wall art. The first step is to turn your artwork into a digital file. I photograph my artwork with a high-quality camera to turn it into a digital file, but you can also scan it and achieve the same results. If you’re using a scanner make sure that your DPI (resolution) is set to at least 300 to ensure that your scan is high-res enough and doesn’t turn out blurry!
Open in Photoshop. The next step is to open your artwork file in Photoshop. Next, click the lock icon on the Background Layer to unlock it so that you can manipulate the layer. Magic Wand Tool Next, grab the magic wand tool (keyboard shortcut: w). The magic wand tool allows you to automatically select things that are the same color and texture, and since this art heart is on a white background, we’ll be able to easily select it and remove it using this tool. Before making the selection take a look at the settings bar at the top of your screen. Make sure that “Contiguous” is selected. This means that when you select the paper background it will only select white areas that are touching each other. Meaning that it won't select any stray white areas inside of your artwork. Then check the “Tolerance” setting. I like to set mine to around 20. Tolerance indicates how sensitive the selection tool is going to be. Higher tolerance means it will be looser with its selection and lower tolerance means that it will be more selective!
Now Photoshop has selected the entire background! There are a few final steps to take to clean up the selection and make it more natural. If you zoom in, you might notice that the selection is just the slightest bit off from your design resulting in a halo effect around your artwork. We can easily tighten that up so that there isn’t that white halo effect around the design when you remove the background. Right now, the background is selected. We want to make sure that we inverse the selection so that the actual design is selected. Now zoom in so you can see how tight your selection is. To make the selection tighter and more natural click Select → Modify → Contract. And tighten the selection by one to three pixels. In my example, I contracted by two pixels and that worked to bring the selection to a tighter place. Now there’s one last step to make the selection look more natural. Go back to the select menu and choose Select → Modify → Feather. I generally feather by three pixels as this helps remove any jagged edges and keeps the integrity of the natural brushstrokes. Remove the Background. Now it’s time to remove the background! To do this in a non-destructive way, select a clipping mask. Click the clipping mask icon on the layers panel and your background will be removed! And the best part is that you can always delete the mask if you ever need to make any adjustments. Now you’ll see that the white background has been replaced with a checkered background indicating that it’s transparent. If these steps removed your background, then you’re good to go!
But I always like to do a final clean-up to make sure that my artwork is clean, polished, and ready to go on products. In my example, there are a couple of things we need to do to clean up the final illustration before exporting it. You’ll notice that my signature is still at the bottom of the heart. I want to remove that so the design is on its own. This is super easy to do with a clipping mask. If you have any straggler elements that didn’t get removed, you can easily remove them with the brush tool. Now you can simply paint over any areas you want to remove! The way this works is that with a clipping mask, anything painted in black is concealed as part of the mask. And there you have it! A finalized piece with a transparent background! Now you can export your artwork as a .png file to retain that transparency.
There are several final notes regarding edge cleanup and resizing to fit different backdrops. After removing the background, you might see some leftover bits around the edges of your subject. Double-check the edges of the object you cut out to make sure you’re happy with your selection, particularly around intricate areas such as animal fur or human hair. Turn your art into a digital file by photographing or scanning, then remove the background, refine edges, and replace with your desired backdrop. The Quick Action approach can speed up the process, but for complex edges, the Pen Tool or Select and Mask will yield cleaner results. Finally, save your image as PNG to preserve transparency and versatility for product mockups.
Adobe Photoshop 2025 tips and tricks Remove Background
There are many tools and paths to choose from, but the core idea is to isolate the subject and remove or hide the background using masks or deletion. The Remove Tool and Object Selection tool provide AI-assisted speed, while the Pen Tool and Lasso options offer precision for intricate subjects. Practice with a few different images to learn how edge behavior changes with color, texture, and edge softness. By leveraging layers, masks, and refined edge work, you can achieve clean cutouts suitable for portfolios, product imagery, or creative composites.
tags: #photoshop #remove #background #colour