DaVinci Resolve is not just a video editing software but one of the best color grading solutions at the moment and, moreover, one of the commonly accepted standards in the whole industry. It is also well known that production has evolved considerably further in comparison with photography - both technically and aesthetically. Therefore, photographers often tend to peek at professional colorists, and it’s quite understandable. At least it broadens the horizons and helps them to borrow the same powerful, high-quality and comprehensible tools and approaches. We’ll try to give you a hand with that.
DaVinci Resolve is a far more sophisticated color grading toolset compared to Adobe Photoshop or Lightroom. Just look at color wheels, variety of properly working curves, waveforms, bunch of color transformation tools, extended node trees instead of simple and linear layer sets. Don’t forget about floating point processing that produces technically better results. However, DaVinci is a video grading software, not a dedicated photo editor. Therefore, with all its benefits there are some drawbacks: limited RAW support, no conventional crop tools and inconvenient workflow with vertical photos. While DaVinci accepts photos of any size, timeline and output file dimensions are limited to a maximum of Ultra HD 4K (3840 x 2160 px) in the free version. There are also other limitations out of photo processing context.
Step by step beginners guide
We assume that if you are reading this article, it is likely that you are not yet familiar with DaVinci Resolve. Otherwise you don’t need any special knowledge to process photos since, in fact, it’s just a particular case of video processing. However, one article can’t cover all the endless possibilities and workflows of DaVinci. It’s a powerful and rich toolset, unconventional for photographers in many aspects. So this publication is limited to the basic principles of photo editing. Our main goal is to teach you the basic workflow from import trough export. Image correction methods and tools require separate deep study (there is a bunch of free tutorials and paid classes available).
2.1 Download DaVinci Resolve from official site and install it
Please remember that DaVinci free version is limited to a maximum of Ultra HD 4K (3840 x 2160 px) resolution on timeline and export. If you need higher resolutions - there is single payment option to get full ‘Studio’ version for $299 (which, however, isn’t that much compared to Adobe Photoshop subscription for several years).
2.2 Launch DaVinci Resolve
Then Project Manager appears. Create New Project hitting corresponding button and give it a name.
2.3 Add files you want to process
Go to Media tab at the bottom of the main DaVinci window. In the Media Storage section (upper left) find your photos folder. It’s more convenient to pick files for processing in advance, then put them all in a single folder. JPEG, TIFF and DNG file formats could be processed, along with some particular camera RAWs. For more information about RAW workflow - see the end of the article. Then select checkbox Show Individual Frames in the Media Storage settings to see the full file list without merging images to sequences. Select files and drag them to the Master frame (the biggest one).
2.4 Go to Edit tab at the bottom
2.5 Set Clip duration. From the DaVinci aspect, static images are individual frames that are assembled into video clips on a timeline. There will be a static 5 sec clip added to the timeline when you drag a photo, by default. But for our specific needs 1 frame clip would be better (otherwise we’ll get extra copies of the same picture on export). To do this open DaVinci Resolve menu - Preferences. Go to User section and select Editing on the left. In General Settings set Standard Still Duration as ‘Frames: 1’.
2.6 Color Settings. If you are working on Mac checking Use Mac Display Color Profiles for Viewers (General section) makes color rendering more precise - usually but not always. It depends on display calibration quality and some other DaVinci settings. As a starting point we recommend to try both variants an to choose the setting that makes images inside DaVinci match better with the exported ones. If you need more accurate color reproduction with DaVinci in the future, we recommend a professional consultation and calibration service. For example, Alexander Prokhorushkin and his ICG Cal. You can also check the article Setting DaVinci Resolve (Studio) for color correction by Ilya Malykh (in Russian).
2.7 Add photos to the timeline. Select desired photos in Media Pool (upper left) and drag them to the timeline (bottom center). As we earlier set default clip duration to 1 frame, our photos will appear as thin lines (very short clips). But timeline could be scaled up and down using Cmd (Ctrl) +/- hotkeys.
2.8 Go to Color tab at the bottom
2.9 Setting aspect ratio. Default timeline size is Full HD 1920×1080 px. But photos usually have another aspect ratio (not 16:9) and black bars at the sides will be visible. Timeline dimensions must be set to match ratio and properly fit the whole image into the frame. Today we are experimenting with Fuji X-T3 JPEG files measuring 6240×4160 px. This is a typical 3:2 aspect ratio. Free version of DaVinci Resolve is limited to the maximum of 3840×2160 px. Simple calculation gives an optimum size of 3240×2160 px to fully fit this image into view. Let’s change Project Settings accordingly (hit the ‘gear’ icon in lower right corner). Here are the maximum pixel dimensions for some typical aspect ratios: 3:2 - 3240×2160; 4:3 - 2880×2160; 0:1 - 2160×2160; 2:0 - 2160×2160.
2.10 Add Dehancer Pro OFX plugin to the processing chain (special version for photographers Dehancer Photo Edition can be used too). This could be a long bookshelf for countless DaVinci color grading manuals. But our processing example is based on Dehancer Pro OFX plugin, which can be downloaded and installed in advance (don’t forget to restart DaVinci). You can also install the Dehancer Photo Edition version, designed specifically for photographers and limited to one frame per clip export without watermark - thus allowing full photo processing but useless for video. You can also edit photos in DaVinci by many different ways and methods, even without plugins. It depends on what special results you want to get and how fast. Processing chain in DaVinci is determined by nodes. Nodes are the main structural element in this sequence, a kind of ‘box’ where some image transformation is taking place. Each node has parameters controlling its effect. Nodes workspace can be found at the right of the main view. There is always one color correction node added to all clips by default. This is where you can spin the famous color wheels and use other basic correction tools (bottom left). But if you want to get really interesting results, you’ll probably need advanced tools. One of the best tools with film profiles and additional film effects is Dehancer Pro (or the simplified version Dehancer Film). Go to Open FX section (upper right), scroll down to find Dehancer Pro (or Dehancer Photo Edition) you just installed and drag it over the link so that it would stand in the sequence behind the first one, as shown on the picture: There are different ways of adding nodes but this is the simplest one.
2.11 Image adjustment. Advanced description of all plugin tools and options is a topic for a separate article. But in general all settings are rather intuitive and their impact is clearly visible. There are many film profiles to choose from, followed by film and print parameters like exposure, push/pull, contrast, saturation, analogue range limiter, expand and others. Along with plugin parameters you can tweak image within the first (previous) color correction node. White balance, shadows/highlights, curves and other tools are located there. Waveform (lower right) is very convenient for technical image control. Perhaps at a more advanced level you’ll also need one more node to convert input sRGB color space to Rec.709 (standard for video), but in fact that’s not really necessary - just keep looking at the image and use the waveform properly. You may also add other built-in DaVinci nodes or other plugins to the chain, crop and rotate the image and add many other effects. Note: For your convenience you can hide all unused tools and enlarge Main View to the whole DaVinci window, leaving only current node parameters visible - just hit Shift+F.
2.12 Correcting other images. Select next image ‘clip’ (Up and Down arrows also can be used for this) and make necessary adjustments. Repeat this for all clips on the timeline. If a series of photos is processed it is practical to transfer parameters from previous clip to the next one. There are several ways to do this. The simplest one is to use memory slots. Select the source photo clip and press ALT+1 to copy settings to the memory slot 1. Then go to the next clip and press CMD+1 to paste settings. Then use pasted settings as a starting point for further fine-tuning. There are 8 independent memory slots, accessible with ALT (Option) and CMD keys, followed by the numbers from 1 to 8. A good idea is to use them as temporary ‘presets’. With proper skill this is a confident and quick way to process fairly big batches of photos (and most importantly, to maintain a consistent overall style of the series).
2.13 Exporting files. When everything is set for all photos (clips), then go to Deliver tab at the bottom. Specify the name of the group of files and the path to the folder where they will be saved. Select “Render: Individual Clips“. In the Export Video section select TIFF format (you can also select DPX or JPEG2000). In the File tab check Use unique filenames. There you can also choose the file naming template or leave the default values. Press Add Render Queue button.
2.14 Enjoy the process.
Working with RAW photos. Most modern cameras produce good enough JPEGs for further processing with DaVinci - but under two important conditions: Camera dynamic range is used effectively when shooting, i.e. the shot is exposed without critical detail loss in shadows and highlights. White balance does not deviate too much from ‘normal’ for given subject. RAW contains much more information and may be worthwhile if the photo was taken under difficult conditions or with exposure and white balance errors. RAW also typically produces better results on cameras with aggressive JPEG processing (typical for smartphones). Many photo RAW formats are supported natively in DaVinci. First of all it’s the commonly used DNG format and some others. Unfortunately, DaVinci developers do not publish a full list of supported cameras, so compatibility check is up to you. If you can’t drag RAWs to Project Bin and then to the timeline as it is (like with JPEG or TIFF), probably this particular RAW format isn’t supported natively. No problem! The problem is solved by converting RAWs to DNG format - with the help of free Adobe DNG Converter utility. 1. Download, install and run the utility. 2. Check the settings (Change Preferences button), they should appear as stated below: 3. On the main utility screen choose the input folder with your source RAWs, then select output folder for converted DNGs and hit Convert button. Your photos will be processed to DNGs, compatible with DaVinci.
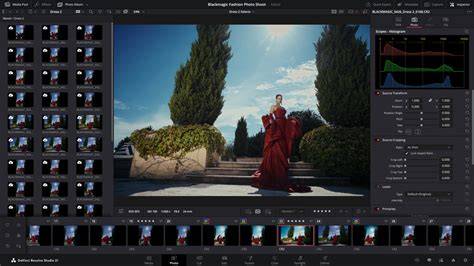
Camera Raw settings. Drag photos to the timeline. In the Color tab you will find a new section called Camera Raw (red outline on the screenshot below): First column contains input parameters: Decode Quality - Defines maximum input resolution of RAW processing. Best setting is Full Res, unless your files are really huge. Decode Using - This defines whether to use common or individual settings for every clip. Better use Clip when working with photos. White Balance - Select from different WB presets. Color Space - This is a ‘working color’ space and it should follow the project settings, by default it’s Rec.709. Gamma - Usually Gamma (contrast curve) for photo processing must be set to sRGB. The second and third columns contain typical image parameters, well known from any ‘normal’ RAW converter. Still Photos! The Photo page brings Hollywood's most advanced color tools to still photography for the first time! Whether you’re a professional colorist looking to apply your skills to fashion shoots and weddings, or a photographer who wants to work beyond the limits of traditional photo applications, the Photo page unlocks the tools you need. Start with familiar photo tools including white balance, exposure and primary color adjustments, then switch to the Color page for access to the full DaVinci color grading toolset trusted by Hollywood’s best colorists! You can use DaVinci’s AI toolset as well as Resolve FX and Fusion FX. Colorists who have spent years mastering the high-end color tools in DaVinci Resolve can now apply those skills to still images! Controls include primary color correction, curves, qualifiers and Power Windows. You can build complex grades in a node-based workflow that goes far beyond the layer-based approach of conventional photo applications. You can even use professional scopes for photography, including parade, waveform, vectorscope and histogram. There is a wide range of Resolve FX and AI tools to add cinematic effects and isolate subjects, objects or backgrounds with a click. For photographers, the Photo page offers a familiar set of tools alongside DaVinci’s powerful color grading capabilities. It includes native RAW support for Canon, Fujifilm, Nikon, Sony and even iPhone ProRAW. All image processing takes place at source resolution up to 32K, or over 400 megapixels, so you're never limited to project resolution. Familiar basic adjustments including white balance, exposure, color and saturation give you a comfortable starting point. With non-destructive processing you can reframe, crop and re-interpret your original sensor data at any time. The Photo page Inspector gives you precise control over the transform and cropping parameters of your images. Reframe and crop non-destructively at the original source resolution and aspect ratio, so you’re never restricted to a fixed timeline size! Zoom, position, rotate and flip images with full transform controls and use the cropping parameters to trim the edges of any image with precision. Reframe a shot to improve composition, adjust for a specific ratio for print or social media use, or simply remove unwanted elements from the edges of a frame. DaVinci Resolve is the world's only post production software that lets everyone work together on the same project at the same time! Built on a powerful cloud based workflow, you can share albums, all associated metadata and tags, as well as grades and effects with colorists, photographers and retouchers anywhere in the world. Blackmagic Cloud syncing keeps every collaborator with the latest version of your image library in real time, and remote reviewers can approve grades offsite without needing to be in the same room. The Photo page gives you everything you need to manage your entire image library from import to completion. You can import photos directly, from your Apple Photos library or Lightroom, and organize them with tags, ratings, favorites and keywords for fast, flexible management of even the largest libraries. It supports all standard RAW files and image types. AI IntelliSearch lets you instantly search across your entire project to find exactly what you’re looking for, from objects to people to animals! Albums are a powerful way to build and manage photo collections directly in DaVinci Resolve. You can add images manually to each album or organize by date, camera, star rating, EXIF data and more. Powerful filter and sort tools give you total control over how your collection is arranged. The thumbnail view displays each image’s graded version alongside its file name and source clip format so you can see your grades at a glance. Create multiple grade versions of any image, all referencing the original source file, so you can explore different looks without ever duplicating a file. Connect Sony or Canon cameras directly to DaVinci Resolve for tethered shooting with full live view! Adjust camera settings including ISO, exposure and white balance without leaving the page and save image capture presets to establish a consistent look before you shoot. Images can be captured directly into an album, with albums created automatically during capture so your library is perfectly organized from the moment you start shooting. Grade images as they arrive using DaVinci Resolve’s extensive color toolset and use a hardware panel for hands-on creative control in a collaborative shoot. The Photo page gives you access to over 100 GPU and CPU accelerated Resolve FX and specialty AI tools for still image work. They're organized by category in the Open FX library and cover everything from color effects, blurs and glows to image repair, skin refinement and cinematic lighting tools. These are the same tools used by Hollywood colorists and VFX artists on the world's biggest productions, now available for still images. To add an effect, drag it to any node. Magic Mask makes precise selections of subjects or backgrounds, while Depth Map generates a 3D map of your scene to separate foreground and background without manual masking. Add a realistic light source to any photo after capture with Relight FX. Relight analyzes the surfaces of faces and objects to reflect light naturally across the image. Face refinement automatically masks different parts of a face, saving countless hours of manual work. Sharpen eyes, remove dark circles, smooth skin, and color lips. The Film Look Creator lets you add cinematic looks that replicate film properties like halation, bloom, grain and vignetting. AI SuperScale uses the DaVinci AI Neural Engine to upscale low resolution images with exceptional quality. UltraNR is a DaVinci AI Neural Engine driven denoise mode in the Color page’s spatial noise reduction palette. Use it to dramatically reduce digital noise from an image while maintaining image clarity. Sample an area of a scene to quickly cover up unwanted elements, like objects or even blemishes on a face. The patch replacer has a fantastic auto grading feature that will seamlessly blend the covered area with the surrounding color data. The Quick Export option makes it fast and easy to deliver finished images in a wide range of common formats including JPEG, PNG, HEIF and TIFF. Export either an entire album or just selected photos providing flexibility to meet your specific delivery needs. You can set the resolution, bit depth, quality and compression to ensure your images are optimized for their intended use. Whether you're exporting standalone images for print, sharing on social media platforms or delivering graded files to a client, Quick Export has you covered. The Photo page uses GPU accelerated processing to deliver fast, accurate results across your entire workflow. Process hundreds of RAW files in seconds with GPU accelerated decoding and apply Resolve FX to your images in real time. GPU acceleration also means batch exports and conversions are dramatically faster than conventional photo applications. On Mac, DaVinci Resolve is optimized for Metal and Apple Silicon, taking full advantage of the latest hardware. On Windows and Linux, you get CUDA support for NVIDIA GPUs, while the Windows version also features full OpenCL support for AMD, Intel and Qualcomm GPUs. Hollywood colorists have always relied on hardware panels to work faster and more creatively and now photographers can too! The DaVinci Resolve Micro Color Panel is the perfect companion for photo grading as it is compact enough to sit next to a laptop and portable enough to take on location for shoots. It features three high quality trackballs for lift, gamma and gain adjustments, 12 primary correction knobs for contrast, saturation, hue, temperature and more. It even has a built in rechargeable battery!
Hollywood’s most popular solution for editing, visual effects, motion graphics, color correction and audio post production, for Mac, Windows and Linux. Includes large search dial in a design that includes only the specific keys needed for editing. Editor panel specifically designed for multi-cam editing for news cutting and live sports replay. Includes buttons to make camera selection and editing extremely fast! Full sized traditional QWERTY editor keyboard in a premium metal design. Featuring a metal search dial with clutch, plus extra edit, trim and timecode keys. Powerful color panel gives you all the control you need to create cinematic images. Includes controls for refined color grading including adding windows.
Get incredibly fast audio editing for sound engineers working on tight deadlines! Used by Hollywood and broadcasters, these large consoles make it easy to mix large projects with a massive number of channels and tracks. Fairlight studio console legs at 0º angle for when you require a flat working surface. Fairlight studio console legs at 8º angle for when you require a slightly angled working surface. Get quick access to virtually every Fairlight feature!
Update: In April 2026 Blackmagic Design has added a Photo page to Resolve 21 and Resolve Studio 21. This was initially a public beta release and the final release version is now out, as of June 2026. The Photo page creates a workflow similar to Adobe’s Lightroom or Apple’s Photomator. Last week, Blackmagic Design announced the release of the beta version of DaVinci Resolve 21. One of the new features of that release took everyone by surprise: the software would now support photo editing. Resolve 21 now has a photo page which lets you work with RAW and non-RAW photos, with RAW support from a variety of manufacturers. Not only that, but you can use the full (almost) colour and Fusion pages with your still photos for complex colour grading and image editing. It’s a pretty big deal, although there are still quite a few limitations in the current version.
Why is Davinci Resolve Supporting Still Photos a big Deal? So why is this such a big deal? If you have been reading about this at all, you’ve undoubtedly seen some incredibly hyperbolic articles and commentary around this release of DaVinci Resolve. People have declared it the obligatory “Lightroom Killer” (it’s not), as well as the usual round of “Can we cancel our Adobe subscriptions now?” (No.) The thing is, it’s not a “Lightroom Killer” at all. It’s not like Lightroom, really, in any way other than the fact that it works with RAW photos and has some organizational tools. And that’s actually its killer feature. It’s the fact that it’s totally different is what’s so good about it. In fact, as far as I can tell, it’s pretty unique in terms of still image editing.
How To ANIMATE Still Photos In Davinci Resolve
Here’s a funny story. A year ago, on Threads, I actually expressed a desire for exactly this. I never expected that they would actually do it. If you have never used node-based editing before, it can take a bit of getting used to, but once you do, you will see the power of it. I first got my taste of it way back when Apple had a fantastic compositing application called Shake. This was a superb piece of software, and I’m still bitter that they discontinued it. While this was focused on compositing rather than color correction, the concepts are the same. And with Resolve, you actually get the best of both worlds, as the Fusion page works similarly to how Shake worked (and how the industry leader, Nuke, works).
Before you get too excited though, there are a couple of big limitations with the current release that you should be aware of. Bear in mind that it is still in beta, so this may change before it is released. Firstly, there are no proper camera matching colour profiles, so your images colours will be off. Sometimes significantly. Secondly, there doesn’t seem to be any lens correction profiles, which is perhaps a bigger problem. The raw conversion engine in Resolve is primarily designed for video, so it’s not great for stills. There is poor noise control and there doesn’t appear to be any raw level noise reduction. There is spatial and temporal noise reduction in the software, but these require the studio version. I have tried these and they’re not as good as the options in still software, because again, they’re optimized for video. If you’re shooting images at high ISO the results won’t be great. In this case you would be better off using a third party converter to convert to either a DNG or a TIFF. You could use something like PureRAW to bake in the noise reduction and lens corrections, and this would solve part of the problem. It doesn’t address the colour accuracy though.
These are all things that can be improved though. The company has stated that it is working with camera manufacturers, and they do have a great track record of developing the software, so I am optimistic.