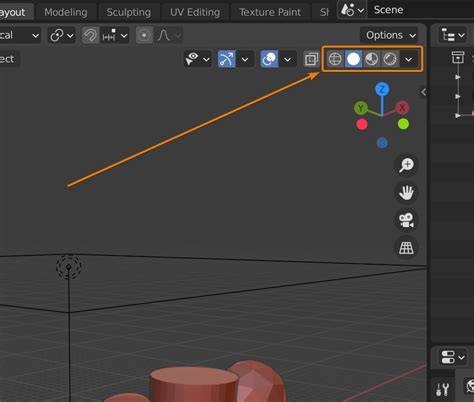
Viewport shading is the eye into your scene allowing you to get a good look at your work. But in order to use it as effectively as possible we need to put on the right goggles for the task. To change the viewport shading mode, find the shading modes in the top right corner of your 3D viewport. As a rule of thumb, use solid shading for modeling, material preview for materials, texturing and shading. Rendered view in turn is intended for lighting setup and rendering.
What viewport shading is and why it matters
Viewport shading refers to the overall look of the 3D viewport. Since Blender version 2.80 and the introduction of Eevee we have a lot more options than we had before. We find the settings for the viewport shading in the top right corner of the 3D viewport. These are the shading modes available from left to right: Wireframe Solid Material preview, a.k.a. lookdev mode Rendered. There is also a dropdown menu with many mode dependent options. Most of these settings are down to personal preferences. But it can be good to know what kind of information we can view directly in the 3D viewport as we work with Blender.
In this article we are focusing on shading. But the shading also go hand in hand with overlays. We cover those in this article: Related content: How to use 3D viewport overlays in Blender 3D. I will use this scene to show some viewport examples. This is a print screen from a Cycles rendered viewport with denoising turned on. This is most often because we are still stuck in solid viewport mode. To resolve it, just change from solid viewport mode to material preview mode in the top right corner of the 3D viewport.
Solid viewport shading: the workhorse for modeling
Viewport shading solid mode. Often when we start a project in Blender, modeling is the first thing we do. For this we mostly use solid viewport shading, so why not start there. You can learn more about Blenders modeling tools in this article. Related content: More than 30 Blender modeling tools explained. If solid viewport shading is enabled, and we expand the viewport shading menu we will see four sections: Lighting, Color, Background, Options.
The solid view is based on the workbench engine. While I have not found any capability within the workbench engine that can't be accessed in Eevee or Cycles, it is still nice from an organizational perspective that we can access each part of the 3D viewport as its own render engine. Later when we dive into material preview mode we will learn that material preview is actually using Blender's real-time render engine Eevee. It is not just based on Eevee. It is Eevee. There is a relation between render engines and view modes here.
Lighting in solid mode
In the lighting section we have three options: Studio, Matcap and flat. The light we set up in solid viewport mode always follows the viewing angle. So if the light is set up to light from the left it will light from the left no matter how we move the camera.
Studio light is a basic light setup for the viewport. If we press the current sphere we can see that we have a few presets. For each preset we can change the rotation of the light setup. This lighting system can be further customized if we press the gear icon. This takes us to the light setup where we can access up to four different lights. If you press "edit studio light" the viewport lighting for solid mode will be setup from here instead of the presets. Here we can see the studio light section and below it, we can expand the "editor". Each light has a few basic components: Diffuse, specular and smooth which dictate the sharpness of the shadows. By click and dragging the spheres we can also change the direction of each light as well as saving additional presets. However, the presets we save will not be accessible from the viewport. Instead, we have to go to user preferences to enable them.
Matcap stands for material capture. It may seem similar to studio light at first. The big difference here is that matcaps are created from images. They are more dependent on the object than studio light, and we can use different matcaps to highlight different features of an object. Matcaps are often used when sculpting to highlight different features and to see the shapes better. A common matcap for this is the diffuse dull red. We can create custom matcaps as well but it is not as straight forward as going into user preferences. But we can add matcaps in the same place if we created one in another blendfile. An interesting use of matcaps is the normal map matcap. We can use this to create normal maps based on geometry that we model. For instance, we can create details and render it using viewport rendering to get the matcap look.
The last option is flat. This essentially does not calculate any lighting. Instead, we rely on just the color information. This reduces the forms in our scene to just flat shapes and outlines. This is what it would look like by default. But we can change the color of our objects in the next section. This is an example with flat shading and random colors.
Color and background in solid mode
In the color section we can decide what source we want to use to bring in colors for our objects. This is then mixed with the light setup to create the viewport shading colors. By default, this is set to material. If we go to the material properties tab in the properties panel and find the "viewport display" section, we have a color property. This is white for all materials by default, just like we see in the example above. We can set a custom color here for each material in our blend file. If we change the color setting to "object" instead, we go to the object properties and find the "viewport display" section here instead and use the color value found here. We can find a viewport display section in these places: Object properties, Material properties, World material properties.
We can also use the vertex paint. Vertex painting is a whole topic in itself that I won't cover here. But you can go to the top left corner of your 3D viewport and switch mode to vertex paint. In this mode you have access to painting based on vertex. You can give each vertex a color and the "resolution" or control over how detailed you can paint depends on your objects mesh density. On the second row we have single. This will allow us to set a custom color for all objects right here in the menu. The last two alternatives are random which will give us random colors for each object and texture will show color based on the texture we have set up on our objects.
Background options include theme, world, and viewport. The default is theme. This just uses whatever color or gradient is configured in our theme. To find this setting, go to Edit → Preferences. Navigate to "3D viewport" and find "theme space" at the bottom. Then open the "Gradient colors" section. Here you will find the background settings for your theme. The "world" option will use the color found in viewport display under the world material tab in the properties panel while "viewport" will give you a color selector right in the menu. These options may seem like duplication, but they serve different UI contexts.
Other solid mode options
Options for solid view include Backface culling, X-ray, shadow, cavity, and more. Backface culling hides any face viewed from the backside, which can help to see topology or detect normal issues. X-ray toggles allow selection of things behind other objects; the value slider changes transparency. The shadow setting tests how light interacts in real time and can be refined with the gear icon for direction and terminator properties. Cavity controls contrast and spread of edge features on the mesh. The gear icon also exposes samples and distance, but higher values may harm performance. Depth of field in solid mode is limited since it relies on camera settings. The outline and specular light options add stylized or subtle highlights on edges and ridges.
Material Preview mode: quick texture and shader checks
Material preview mode, like solid view, is based on Eevee. It is meant as a quick preview for materials as we create them in the shader editor. We can turn world light and scene lights on or off to see how materials react to different lighting. Built-in hdri maps provide lighting to preview materials under various conditions; we can rotate the hdri, adjust light output strength, opacity, and blur the hdri. The gear icon opens the light section in Preferences to add more hdri maps. The important caveat is that the default material preview does not cast shadows because the world material in Eevee cannot cast shadows, so we rely on the built-in lighting to explore material looks. The render pass section lets us view individual Eevee render passes such as diffuse, specular, shadows, or mist, enabling precise inspection of what contributes to each pixel color.
In practice, use material preview mode when texturing and shading is the primary focus. It provides fast feedback and a lighting setup that helps verify how materials will appear under a range of lighting without performing full renders.
When to use which viewport shading mode
- Solid: primary mode for modeling and quick geometry checks, with adjustable lighting and backface options.
- Material Preview: best for shading and texturing iterations, using Eevee-based lighting and HDRI options.
- Rendered: used for lighting setup and final look checks once scene lighting and materials are configured, matching the final render engine.
Tips for efficient viewport workflows
- Use the pie menu (Z) to switch shading modes quickly while modeling.
- Toggle X-ray independently of wireframe to see geometry behind other objects during selection.
- Experiment with matcap materials for quick shape-reading during sculpting or modeling tasks.
- Leverage render passes in material preview to debug or fine-tune specific lighting channels.
All About Viewport Shading - Blender 2.9 Eevee Tutorial
In summary, understanding solid mode and its interplay with overlays and material preview can significantly improve modeling, shading, and lighting workflows in Blender. The solid viewport forms the backbone of early-stage modeling, while material preview provides rapid feedback during shading and texturing, and rendered view helps with lighting verification and final look development.